You can use ZIndex property to change the order in which controls are rendered on a canvas.
The control with highest ZIndex value will be shown at the very top. Here Blue rectangle is having ZIndex 3, Yellow having ZIndex 2, so Blue rectanle will appear at the very top, followed by Yellow rectange and Cyan rectangle.
Programatically changing the ZIndex
private void Button_Click(object sender, RoutedEventArgs e)
{
Canvas.SetZIndex(rectCyan, 4);
}
Showing posts with label Silverlight 2. Show all posts
Showing posts with label Silverlight 2. Show all posts
Friday, November 21, 2008
Silverlight 3, WPF Positioning with ZIndex
Friday, October 10, 2008
Silverlight 3/Wpf : Adding Controls Dynamicallys
Lets see how to dynamically add controls and attaching event handler to the added control.
Here I am creating an object of button class and adding it into the Grid using the Add method of Grid's Children property.
private void btnAddControl_Click(object sender, RoutedEventArgs e)
{
Button btn = new Button();
btn.Click += new RoutedEventHandler(btn_Click);
btn.Content = "Shalvin";
btn.Width = 75;
btn.Height = 25;
Grid1.Children.Add(btn);
}
private void btn_Click(object sender, RoutedEventArgs e)
{
//MessageBox works only with WPF , Silverlight 3 and not with Silverlight 2
MessageBox.Show("ShalvinPD.blogspot.com");
}
Result
WPF Routed Event
A routed event is a type of event that can invoke handlers on multiple listeners in an element tree, rather than just on the object that raised the event.
For example if you want a single event handler for the buttons inside a Grid you can define a Routed event as Button.Click = "Grid_Click" inside the Grid as shown in the diagram.

private void Grid_Click(object sender, RoutedEventArgs e)
{
//MessageBox works only with WPF and not Silverlight 2
MessageBox.Show("ShalvinPD.blogspot.com");
}
Wednesday, October 8, 2008
WPF Templates
WPF introduces the concept of lookless controls.
Using Templates it is possible to change the appearance of a control. For examples it is possible for a ListBox to contain the Photos of employees instead of the usual List Items.
I am going to demonstrate creating a simple Template whereby a button will appear as a blue rectangle.

Silverlight Tags
<UserControl x:Class="ButtonTemplate.MainPage"
    xmlns="http://schemas.microsoft.com/winfx/2006/xaml/presentation"
    xmlns:x="http://schemas.microsoft.com/winfx/2006/xaml"
    xmlns:d="http://schemas.microsoft.com/expression/blend/2008"
    xmlns:mc="http://schemas.openxmlformats.org/markup-compatibility/2006"
    mc:Ignorable="d"
    d:DesignHeight="300" d:DesignWidth="400">

    <Grid x:Name="LayoutRoot" Background="White">
        <Button Height="50" Width="75">
            <Button.Template>
                <ControlTemplate>
                    <Rectangle Fill="LightBlue"/>
                </ControlTemplate>
            </Button.Template>
        </Button>
    </Grid>
</UserControl>
Result

As shown in the output the button can respond to click event as expected.
Now lets create an ellipse button.

Result

Friday, August 22, 2008
WPF Layout with Grid
WPF layout system helps in having fine grained control over the placing of controls.
Since I am more into the web domain I am most comfortable with the Grid which is the most versatile of the built in layout panels available in WPF.
Grid mimics the familiar html Table tags.
Here I am creating a Grid with 3 rows.
I am add two columns using ColumnDefinitions.
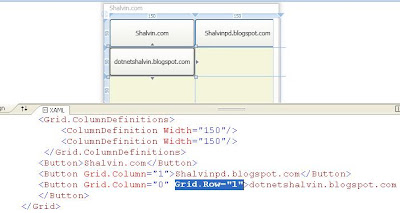
Now if a add a button to the Grid it will appear in the first row and column (zero based index). If I again add one more button to the grid the second button the take the precedence and hides the first button. It is possible to specify in which column the control should appear using Grid.Column and specifying the column number as sholwn in the figure below.
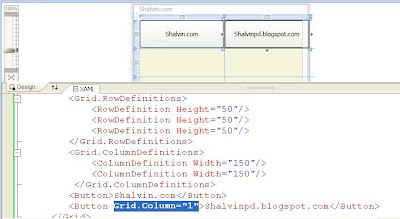
We can also specify the column number using Grid.Column.

We can also specify the column number using Grid.Column.

 <Window x:Class="WPFLayout.MainWindow"
     xmlns="http://schemas.microsoft.com/winfx/2006/xaml/presentation"
     xmlns:x="http://schemas.microsoft.com/winfx/2006/xaml"
     xmlns:d="http://schemas.microsoft.com/expression/blend/2008"
     xmlns:mc="http://schemas.openxmlformats.org/markup-compatibility/2006"
     xmlns:local="clr-namespace:WPFLayout"
     mc:Ignorable="d"
     Title="Shalvin" Height="450" Width="800">
   <Grid ShowGridLines="True">
     <Grid.RowDefinitions>
       <RowDefinition Height="50"/>
       <RowDefinition Height="50"/>
       <RowDefinition Height="50"/>
     </Grid.RowDefinitions>
      <Grid.ColumnDefinitions>
        <ColumnDefinition Width="150"/>
        <ColumnDefinition Width="150"/>
        <ColumnDefinition Width="150"/>
      </Grid.ColumnDefinitions>
     <Button>Shalvin.com</Button>
     <Button Grid.Column="1">shalvinpd.blogspot.com</Button>
   </Grid>
 </Window>
Subscribe to:
Posts (Atom)

