Showing posts with label WPF. Show all posts

Monday, July 18, 2011

Ado .Net DataSet and WPF

If an element uses a binding expression and its DataContext property is null the element continues its search up the element tree. This search continues until the element finds a data object or reaches the toplevel container, which is the user control that represents the page.


DataSet is an offline disconnected data store. A DataSet can be constructed using the Fill method of SqlDataAdapter.

using System.Data;
using System.Data.SqlClient;


SqlConnection cnn;
SqlDataAdapter da;
DataSet ds = new DataSet();
private void Window_Loaded(object sender, RoutedEventArgs e)
{
    cnn = new SqlConnection(@"Data Source=.\sqlexpress;Integrated Security=sspi;Initial catalog=AirLines");
    da = new SqlDataAdapter("select * from Location", cnn);
    da.Fill(ds, "Loc");
    LayoutRoot.DataContext = ds.Tables["Loc"];
}


<Grid Name="LayoutRoot">
<ListBox ItemsSource="{Binding}"
            DisplayMemberPath="LocationName"
            Height="100" HorizontalAlignment="Left" Margin="10,10,0,0" Name="listBox1" VerticalAlignment="Top" Width="120" />
</Grid>


Binding to DataGrid

<Grid   Name="LayoutRoot">
    <DataGrid ItemsSource="{Binding}" AutoGenerateColumns="True" Height="150" HorizontalAlignment="Left" Margin="17,13,0,0" Name="dataGrid1" VerticalAlignment="Top" Width="325" />
</Grid>


WPF DataGrid Custom Columns
<Grid   Name="LayoutRoot">
<DataGrid ItemsSource="{Binding}" AutoGenerateColumns="False"  HorizontalAlignment="Left" Margin="42,12,0,0" Name="dataGrid1" Width="296">
    <DataGrid.Columns>
        <DataGridTextColumn Header="Serial No" Binding="{Binding LocationId}" />
        <DataGridTextColumn Header="Location Name" Binding="{Binding LocationName}" />
        <DataGridTextColumn Header="Latitude" Binding="{Binding Latitude}" />
        <DataGridTextColumn Header="Longitude" Binding="{Binding Longitude}" />
    </DataGrid.Columns>
</DataGrid>
</Grid>

{Binding LocationName} is the shorthand to {Binding Path=LocationName}


Tuesday, July 28, 2009

WPF Menu

Tweaking the raw Xaml is not needed in the new editions of Visual Studio.

This blog assumes that you are familiar with Xml. If not view my blog Working with Xml.

To Start with I am creating a Menu with a MenuItem called File and below that two MenuItems File, Exit and a Separator in between. It is very much possible to construct a menu with the Menu control and Properties window.

<Menu>


<MenuItem Name="mnuFile" Header="_File">


<MenuItem Name="mnuNew" Header="_New"/>


<Separator/>


<MenuItem Name="mnuExit" Header="_Exit"/>


</MenuItem>


</Menu>

Adding Event Handler to Menu


Pressing the tab key automatically created an event handler.

private void mnuExit_Click(object sender, RoutedEventArgs e)
{
Close();
}

WPF Colors

The Brushes class provides 141 colors.

private void btnColor_Click(object sender, RoutedEventArgs e)
{
this.Background = Brushes.Red;
}


You can also have a wide ranging colors using the combination of Red, Green and Blue.

private void btnGreen_Click(object sender, RoutedEventArgs e)
{
this.Background = new SolidColorBrush(Color.FromRgb(0, 255, 0));
}

In the previous I am creating Green color by assigning 255, the maximum value to Green component, ie. the second parameter


private void btnWhite_Click(object sender, RoutedEventArgs e)
{
this.Background = new SolidColorBrush(Color.FromRgb(255, 255, 255));
}

private void btnYellow_Click(object sender, RoutedEventArgs e)
{
this.Background = new SolidColorBrush(Color.FromRgb(255, 255, 0));
}

Grey Scale
private void btnWhite_Click(object sender, RoutedEventArgs e)
{
this.Background = new SolidColorBrush(Color.FromArgb(255, 255, 255, 255));
}

private void btnBlack_Click(object sender, RoutedEventArgs e)
{
this.Background = new SolidColorBrush(Color.FromArgb(255, 0, 0, 0));
}

private void btnDarkGrey_Click(object sender, RoutedEventArgs e)
{
this.Background = new SolidColorBrush(Color.FromArgb(255, 50, 50, 50));
}

private void btnMGrey_Click(object sender, RoutedEventArgs e)
{
this.Background = new SolidColorBrush(Color.FromArgb(255, 150,150, 150));
}

private void slider1_ValueChanged(object sender,

RoutedPropertyChangedEventArgs e)
{
this.Background = new SolidColorBrush(Color.FromArgb(255,

(byte)slider1.Value, (byte)slider1.Value, (byte)slider1.Value));
}


LinearGradientBrush
LinearGradientBrush displays a gradualy changing mix of two or more color schemes.
The surface where you are planning to draw the linear gradient is considered to he unit 1 wide and 1 unit high.


private void Window_Loaded(object sender, RoutedEventArgs e)
{
this.Background = new LinearGradientBrush(Colors.Red, Colors.Blue, new Point(0, 0), new Point(1, 1));
}


LinearGradientBrush the Coded way


using System;
using System.Windows;
using System.Windows.Controls;
using System.Windows.Media;
namespace WPFBrush
{
class Class1 : Window
{
[STAThread]
public static void Main()
{
Application app = new Application();
app.Run(new Class1 { Title = "Shalvin - Colors" });
}
public Class1()
{
Grid LayoutRoot = new Grid();
this.Content = LayoutRoot;
LayoutRoot.Background = new LinearGradientBrush(Colors.Red, Colors.Blue, 0);
}
}
}


RadialGradientBrush

Grid LayoutRoot = new Grid();
this.Content = LayoutRoot;
LayoutRoot.Background = new RadialGradientBrush (Colors.Red, Colors.Blue);


RadialGradientBrush and GradientStops


RadialGradientBrush brush = new RadialGradientBrush();
Background = brush;
brush.GradientStops.Add(new GradientStop(Colors.Red, 0));
brush.GradientStops.Add(new GradientStop(Colors.Green, .33));
brush.GradientStops.Add(new GradientStop(Colors.Blue, .66));

WPF (Windows Presentation Foundation)

This is a beginner level blog on WPF.


Nesting Controls
Styles
Exploring WPF the Code Way

Majority of examples presented in this blog will work with Silverlight also.
Windows Presentation Foundation (WPF) is the Microsoft's presentation technology for creating compelling user interface including graphics and media.
It is based on Vector Graphics
Create a new project in Visual Studio 2008 by selecting File, New Project.
Starting a WPF Application Project


The WPF editor contains two view the visual representation of the form as well as the XAML implementation of the window.

A WPF Form is in fact a class that inherits from System.Windows.Window. The Window class which in turn inherits from ContentControl class.A ContentControl class can have only a single element as its Content Property.
Inside the Windows is a Grid Control that can hold multiple child controls.


As you set the propeties of an element both the windows designer as well as the xaml gets updated.


Here I am settting the Title for the form.


You can also edit the xaml and the changes will be immediately apparent in the windows designer.


Setting the window title at Runtime

private void Window_Loaded(object sender, RoutedEventArgs e)
{
this.Title = "shalvinpd.blogspot.com";
}


WPF do have a collection of common control which you would expect in a presentation technology.


Button

Drag and drop a button on to the windows design surface.


On clicking the button you will be taken to the event handler.


private void button1_Click(object sender, RoutedEventArgs e)
{
MessageBox.Show("Hello welcome to WPF", "Shalvin.com");
}

Run the application. Click on the button and you will receice a welcome message.


MessageBox.Show Method's Overloads

MessageBox's Show method has 21 overloads, following are a few examples.

private void btnHello_Click(object sender, RoutedEventArgs e)
{
MessageBox.Show("Hello");
}

private void btnHelloCaption_Click(object sender, RoutedEventArgs e)
{
MessageBox.Show("Hello", "shalvin");
}

private void btnYesNo_Click(object sender, RoutedEventArgs e)
{
MessageBox.Show("Hello", "Shalvin", MessageBoxButton.YesNo);
}

private void btnExclamation_Click(object sender, RoutedEventArgs e)
{
MessageBox.Show("Hello", "Shalvin", MessageBoxButton.YesNo, MessageBoxImage.Exclamation);
}

MessageBoxResult
private void btnClose_Click(object sender, RoutedEventArgs e)
{
if (MessageBox.Show("Do you want to quit ?", "Shalvin", MessageBoxButton.YesNo) == MessageBoxResult.Yes)
Close();
}

String Memory Variable

private void btnMemoryVariable_Click(object sender, RoutedEventArgs e)
{
string strName = "Shalvin";
MessageBox.Show("Hello " + strName);
strName = "Shalvin P D";
MessageBox.Show("Hello " + strName);
}


String Concatenation
In this example instread of simply displaying a Hello message the user will be greated with the name entered in text box.


private void button1_Click(object sender, RoutedEventArgs e)

{
MessageBox.Show("Hello " + txtName.Text);
}


Integer Memory Variable and Simple Calculator


int i, j, res;
private void btnAdd_Click(object sender, RoutedEventArgs e)
{
i = Int32.Parse(txtInt1.Text);
j = Int32.Parse(txtInt2.Text);
res = i + j;
lblResult.Content = res.ToString();
}

Here I am defining three integer memory variables i, j and res. Int32.Parse() method is used to convert the textbox data to integer.

<Window x:Class="WpfApplication1.Calc"
        xmlns="http://schemas.microsoft.com/winfx/2006/xaml/presentation"
        xmlns:x="http://schemas.microsoft.com/winfx/2006/xaml"
        Title="Calc" Height="300" Width="300" Loaded="Window_Loaded">
    <Grid>
        <Label Content="Integer 1" Height="28" HorizontalAlignment="Left" Margin="44,33,0,0" Name="label1" VerticalAlignment="Top" />
        <TextBox Height="23" HorizontalAlignment="Left" Margin="120,33,0,0" Name="txtInt1" VerticalAlignment="Top" Width="120" />
        <Label Content="Integer 2" Height="28" HorizontalAlignment="Left" Margin="53,88,0,0" Name="label2" VerticalAlignment="Top" />
        <TextBox Height="23" HorizontalAlignment="Left" Margin="120,80,0,0" Name="txtInt2" VerticalAlignment="Top" Width="120" />
        <Label Content="Result" Height="28" HorizontalAlignment="Left" Margin="63,132,0,0" Name="label3" VerticalAlignment="Top" />
        <Label Height="28" HorizontalAlignment="Left" Margin="120,132,0,0" Name="lblResult" VerticalAlignment="Top" Width="112" BorderBrush="Black" BorderThickness="1" />
        <Button Content="+" Height="23" HorizontalAlignment="Left" Margin="98,196,0,0" Name="btnAdd" VerticalAlignment="Top" Width="75" Click="btnAdd_Click" />
    </Grid>
</Window>

ListBox

ListBox is used for displaying a number of items at the same time. Place a ListBox on to the form and select the Items collection from the properties window. The Collection Editor dialog will appear. You can add additional items to the ListBox by clicking the Add button and specifying a Content.


Behing the scene it will create ListBoxItems tags inside the ListBox tag.


It is possible to add items to ListBox at runtime. Double click on the title of the form and you will be taken to the Loaded event of the Window.
private void Window_Loaded(object sender, RoutedEventArgs e)
{
lstInterests.Items.Add("Guitar");
}


ComboBox
ComboBox contains similar functionality that of ListBox. Above mentioned functionality also works with ComboBox

RadioButton and If else


private void btnGender_Click(object sender, RoutedEventArgs e)
{
if (rbMale.IsChecked == true)
MessageBox.Show("Male candidate");
else
MessageBox.Show("Female candidate");
}


DatePicker Control
private void btnDate_Click(object sender, RoutedEventArgs e)
{
DateTime dt = DateTime.Parse(datePicker1.SelectedDate.ToString());
MessageBox.Show(dt.ToString());
MessageBox.Show(dt.ToString("d"));
MessageBox.Show(dt.ToString("D"));
}

Nesting Controls


As usual you can have event handlers of the controls. In this case I am extracting the value of Inner TextBox, concatenating it with a Hello and MessageBoxing it.

private void btnHello_Click(object sender, RoutedEventArgs e)
{
MessageBox.Show("Hello " + txtName.Text);
}


Styles
Styles as WPF equivalent of CSS in Html.


Working with Styles at Runtime


private void btnBold_Click(object sender, RoutedEventArgs e)
{
btnBold .Style = (Style)FindResource("BoldStyle");
}


Filling Wpf ComboBox with the Contents of a SqlDataReader
using System.Data.SqlClient;
SqlConnection cnn = new SqlConnection(@"Integrated Security=sspi;Initial Catalog=Shalvin;Data Source=.\sqlexpress");
SqlCommand cmd;
SqlDataReader dr;
private void Window_Loaded(object sender, RoutedEventArgs e)
{
cnn.Open();
cmd = new SqlCommand("select * from Categories", cnn);
dr = cmd.ExecuteReader();
while (dr.Read())
{
cboCategories.Items.Add(dr["CategoryName"]);
}
}


Exploring WPF the Code Way
Having seen the fundamentals of working with IDE. Let's turn out attention to the internals of WPF in coded way, means without XAML.

using System;
using System.Windows;
using System.Windows.Controls;
namespace WpfApplication1
{
class Class1 : Window
{
[STAThread]
public static void Main()
{
Application app = new Application();
app.Run(new Class1{Title = "shalvin"});
}
public Class1()
{
Grid LayoutRoot = new Grid();
this.Content = LayoutRoot;
Button btn = new Button();
btn.Width = 75;
btn.Height = 50;
btn.Content = "Hello";
LayoutRoot.Children.Add(btn);
}
}
}

Monday, June 29, 2009

WPF Treeview

TreeView is used for displaying hierarchical data. Individual items in a treeview is called TreeViewItem. Here I am declaratively creating a TreeView.


Output


Constructing a treeview with code
private void Window_Loaded(object sender, RoutedEventArgs e)
{
TreeViewItem tvwIndia = new TreeViewItem();
tvwIndia.Header = "India";

treeView1.Items.Add(tvwIndia);

TreeViewItem tvwKerala = new TreeViewItem();
tvwKerala.Header = "Kerala";
tvwIndia.Items.Add(tvwKerala);

TreeViewItem tvwKochi = new TreeViewItem();
tvwKochi.Header = "Kochi";
tvwKerala.Items.Add(tvwKochi);
}


Wednesday, May 20, 2009

WPF Transforms

Transforms allow you to alter the shape of an element.

Here I am using RotateTransform to Rotate the button 45 degrees and SkewTransform to Skew the button.


Output

Tuesday, May 19, 2009

WPF Databinding

Using Silverlight 3 / WPF Databinding any property can be bound to any other property of source using declarative syntax thereby reduce coding drastically.

Here I am binding the Text Property of TextBox to the Value property of Slider.

ElementName property is used to specify the element to use as binding source.

Path is used to specify the source property of binding source.


 <Slider x:Name="slider1" HorizontalAlignment="Left" Height="70" Margin="163,96,0,0" VerticalAlignment="Top" Width="256"/>  
 <TextBox x:Name="textBox"  
      Text="{Binding ElementName=slider1, Path=Value}"  
      HorizontalAlignment="Left" Height="54" Margin="179,225,0,0" TextWrapping="Wrap"   
      VerticalAlignment="Top" Width="185"/>  


Two way Databinding
In the previous example what we saw was One way databinding, ie. as you scroll the slider the value property is reflected in the textbox. But the user can't type a value into textbox and expect the value of slider to get updated.
This is possible by setting the Mode to TwoWay.

Mode=TwoWay.


For Silverlight 3 use TextBlock control instead of TextBox.

We can bind to any Dependency property in the like manner


<Button 
    Margin="5" Content="Click to Toggle" 
    IsEnabled="{Binding IsChecked, Mode=OneWay, 
    ElementName=EnableButton}" />
<CheckBox 
    x:Name="EnableButton" IsChecked="true" 
    Margin="5" Content="Enable Button" />

In this code we are binding the IsEnabled property of Button to the IsChecked propety of CheckBox.

ItemSource Binding
Lets see how to fill a ComboBox with the Font Names and on selecting an item from  the ComboBox the Label's Font is changed.
<ComboBox x:Name="comboBox" HorizontalAlignment="Left" VerticalAlignment="Top" Width="259" Margin="102,59,0,0" Height="29"
                  ItemsSource="{x:Static Fonts.SystemFontFamilies}" />
<Label Content="Shalvin P D" HorizontalAlignment="Left" VerticalAlignment="Top" RenderTransformOrigin="3.931,6.865" Margin="102,139,0,0" FontFamily="{Binding SelectedItem, ElementName=comboBox}"/>


Binding to a Class

It is possible to bind a control's property to a property of a class. I am going to create a class with a boolean property which denotes the enabled property. Based on the value of the property we are going to set the Enabled property of the class.

class EnabledCheck
{
   public bool IsButtonEnabled { get; set; }
   public EnabledCheck()
   {
      IsButtonEnabled = true;
   }
}

<Window x:Class="WpfDataBindingEg.ButtonClass"
        xmlns="http://schemas.microsoft.com/winfx/2006/xaml/presentation"
        xmlns:x="http://schemas.microsoft.com/winfx/2006/xaml"
        xmlns:local="clr-namespace:WpfDataBindingEg"
        Title="ButtonClass" Height="300" Width="300">
    <Window.Resources>
        <local:EnabledCheck x:Key="ButtonState"/>
    </Window.Resources>
    <Grid>
        <Button Content="Button" HorizontalAlignment="Left" VerticalAlignment="Top" Width="75" Margin="58,67,0,0" IsEnabled="{Binding IsButtonEnabled, Source={StaticResource ButtonState}}"/>

    </Grid>
</Window>

Related blogs
Silverlight 3, WPF Positioning with ZIndex
Silverlight 3/Wpf : Adding Controls Dynamicallys
Silverlight 3/WPF Templates

Friday, November 21, 2008

Silverlight 3, WPF Positioning with ZIndex

You can use ZIndex property to change the order in which controls are rendered on a canvas.


The control with highest ZIndex value will be shown at the very top. Here Blue rectangle is having ZIndex 3, Yellow having ZIndex 2, so Blue rectanle will appear at the very top, followed by Yellow rectange and Cyan rectangle.

Programatically changing the ZIndex

private void Button_Click(object sender, RoutedEventArgs e)
{
Canvas.SetZIndex(rectCyan, 4);
}

Friday, October 10, 2008

Silverlight 3/Wpf : Adding Controls Dynamicallys

Lets see how to dynamically add controls and attaching event handler to the added control.

Here I am creating an object of button class and adding it into the Grid using the Add method of Grid's Children property.

private void btnAddControl_Click(object sender, RoutedEventArgs e)
{
Button btn = new Button();
btn.Click += new RoutedEventHandler(btn_Click);
btn.Content = "Shalvin";
btn.Width = 75;
btn.Height = 25;
Grid1.Children.Add(btn);
}

private void btn_Click(object sender, RoutedEventArgs e)
{
//MessageBox works only with WPF , Silverlight 3 and not with Silverlight 2
MessageBox.Show("ShalvinPD.blogspot.com");
}

Result

Wednesday, October 8, 2008

WPF Templates

WPF introduces the concept of lookless controls.

Using Templates it is possible to change the appearance of a control. For examples it is possible for a ListBox to contain the Photos of employees instead of the usual List Items.

I am going to demonstrate creating a simple Template whereby a button will appear as a blue rectangle.


Silverlight Tags

<UserControl x:Class="ButtonTemplate.MainPage"
    xmlns="http://schemas.microsoft.com/winfx/2006/xaml/presentation"
    xmlns:x="http://schemas.microsoft.com/winfx/2006/xaml"
    xmlns:d="http://schemas.microsoft.com/expression/blend/2008"
    xmlns:mc="http://schemas.openxmlformats.org/markup-compatibility/2006"
    mc:Ignorable="d"
    d:DesignHeight="300" d:DesignWidth="400">

    <Grid x:Name="LayoutRoot" Background="White">
        <Button Height="50" Width="75">
            <Button.Template>
                <ControlTemplate>
                    <Rectangle Fill="LightBlue"/>
                </ControlTemplate>
            </Button.Template>
        </Button>
    </Grid>
</UserControl>


Result


As shown in the output the button can respond to click event as expected.

Now lets create an ellipse button.


Result

Monday, October 6, 2008

WPF Styles

Styles are equivalent to CSS in html. Lets see how to create Styles in WPF.Inside the Window Xaml tag add a Window.Resource section.In the Style tag's TagetType you can specify to what type of control you want the style to apply. Using Setters you can specity the Property and and its corresponding value.


Here is the result


In this example I am setting the Background, Width and Opacity properties for Button. All the buttons in the form will inherit these properties thereby rendering a consistant look and feel.

Friday, August 22, 2008

WPF Layout with Grid

WPF layout system helps in having fine grained control over the placing of controls.

Since I am more into the web domain I am most comfortable with the Grid which is the most versatile of the built in layout panels available in WPF.
Grid mimics the familiar html Table tags.
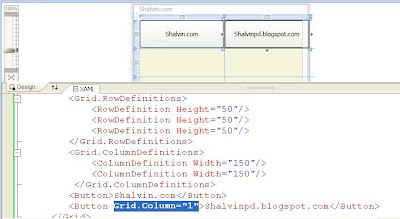
Here I am creating a Grid with 3 rows.


I am add two columns using ColumnDefinitions.


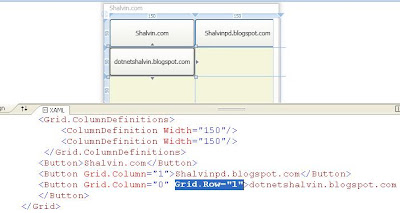
Now if a add a button to the Grid it will appear in the first row and column (zero based index). If I again add one more button to the grid the second button the take the precedence and hides the first button. It is possible to specify in which column the control should appear using Grid.Column and specifying the column number as sholwn in the figure below.


We can also specify the column number using Grid.Column.


 <Window x:Class="WPFLayout.MainWindow"  
     xmlns="http://schemas.microsoft.com/winfx/2006/xaml/presentation"  
     xmlns:x="http://schemas.microsoft.com/winfx/2006/xaml"  
     xmlns:d="http://schemas.microsoft.com/expression/blend/2008"  
     xmlns:mc="http://schemas.openxmlformats.org/markup-compatibility/2006"  
     xmlns:local="clr-namespace:WPFLayout"  
     mc:Ignorable="d"  
     Title="Shalvin" Height="450" Width="800">  
   <Grid ShowGridLines="True">  
     <Grid.RowDefinitions>  
       <RowDefinition Height="50"/>  
       <RowDefinition Height="50"/>  
       <RowDefinition Height="50"/>  
     </Grid.RowDefinitions>  
      <Grid.ColumnDefinitions>  
        <ColumnDefinition Width="150"/>  
        <ColumnDefinition Width="150"/>  
        <ColumnDefinition Width="150"/>  
      </Grid.ColumnDefinitions>  
     <Button>Shalvin.com</Button>  
     <Button Grid.Column="1">shalvinpd.blogspot.com</Button>  
   </Grid>  
 </Window>  

Thursday, August 14, 2008

Wpf and Windows Forms Controls Interop

Though WPF is a Wonderful technology, at times programmers get frustrated with the lack of certain controls. One such control is the DataGrid or GridView. Silverlight 2 infact has a DataGrid, hope in the next release of WPF it will be as feature rich as Windows Forms.

It is very much possible to use Windows Forms controls in WPF.

Start out by dragging a WindowsFormsHost into WPF Windows.


Create an object of System.Windows.Forms..DataGrid and set the Child Property of WindowsFormsHost to the newly created DataGrid object. WindowsFormsHost can have only one child as is obvious form the Child Property.

System.Windows.Forms.DataGrid dg = new System.Windows.Forms.DataGrid();
private void Window_Loaded(object sender, RoutedEventArgs e)
{
windowsFormsHost1.Child = dg;
}

Now you can work with the DataGrid just like you work with it in Windows Forms.

Here is the complete code for connecting the DataGrid to a DataSet.

using System.Data;
using System.Data.SqlClient;

using System.Windows.Forms;

System.Windows.Forms.DataGrid dg = new System.Windows.Forms.DataGrid();

SqlConnection cnn;
SqlDataAdapter da;
DataSet ds = new DataSet();
private void Window_Loaded(object sender, RoutedEventArgs e)
{
windowsFormsHost1.Child = dg;

cnn = new SqlConnection(@"Integrated Security=sspi;Initial Catalog=Shalvin;Data source=.\sqlexpress");
cnn.Open();
da = new SqlDataAdapter("select * from Categories", cnn);
da.Fill(ds, "Cat");
dg.DataSource = ds.Tables["Cat"];
}