Thursday, February 12, 2026

Python Contact Management with JSON

 
 import json  
 import os  
 
 CONTACTS_FILE = "contacts.json"  
 
 def load_contacts():  
   if not os.path.exists(CONTACTS_FILE):  
     return[]  
   try:  
     with open(CONTACTS_FILE, 'r') as file:  
       return json.load(file)  
   except (json.JSONDecodeError, IOError):  
     print("Error reading contacts file. Starting with an empty list")  
     return [] 
     
 def save_contacts(contacts):  
   try:   
     with open(CONTACTS_FILE, 'w') as file:  
       json.dump(contacts, file, indent=4)  
     print("Contact saved successfully")  
   except IOError as e:  
     print(f"Error saving contacts: {e}")  
     
 def create_contact(contacts):  
   print("\n--- Add New Contact ---")  
   name = input("Enter name : ").strip()  
   if not name:  
     print("Name cannot be empty.")  
     return  
   location = input("Enter location : ").strip()  
   if not location:  
     print("Location cannot be empty.")  
     return  
   new_contact= {  
     'name': name,  
     'location': location  
   }  
   contacts.append(new_contact)  
   save_contacts(contacts)  
   print(f"Contact '{name}' added successfully")  
   
 def read_contacts(contacts):  
   print("\n-- All Contacts --")  
   if not contacts:  
     print("No contacts found")  
     return  
   for index, contact in enumerate(contacts, start=1):  
     print(f"{index}. Name: {contact['name']}, Location: {contact['location']}")  
     
 def main():  
   contacts = load_contacts()  
   # read_contacts()  
   while True:  
     print("\n== Contact Management System ==")  
     print("1. Add Contact")  
     print("2 View Contacts")  
     print("3. Exit")  
     choice = input("Enter your choice (1-3): ").strip()  
     print(choice)  
     if choice == '1':  
       create_contact(contacts)  
     elif choice == '2':  
       read_contacts(contacts)  
     elif choice == '3':  
       print("Exiting Contact Management System. Goodbye")  
       break  
     else:  
       print("Invalid choice. Please enter a number between 1 and 3")  
       
 if __name__=="__main__":  
   main()  

Sunday, February 1, 2026

Configuring Swagger in Web API 10

Web API 10 doesn't come with Swagger support. It can be added by adding a reference to Swashbucke.AspNetCore, Adding SwaggerGen to Service, use it in the middleware and making alterations in launchSettins.json.


Program.cs
builder.Services.AddEndpointsApiExplorer();

builder.Services.AddSwaggerGen();

var app = builder.Build();

// Configure the HTTP request pipeline.
if (app.Environment.IsDevelopment())
{
    app.UseSwagger();
    app.UseSwaggerUI();
}
launchSettings.json
"http": {
  ...
  "launchBrowser": true,
  "launchUrl": "swagger",
  "applicationUrl": "http://localhost:5294",
  ...
  }

Thursday, January 23, 2025

.Net 9 with Angular 19

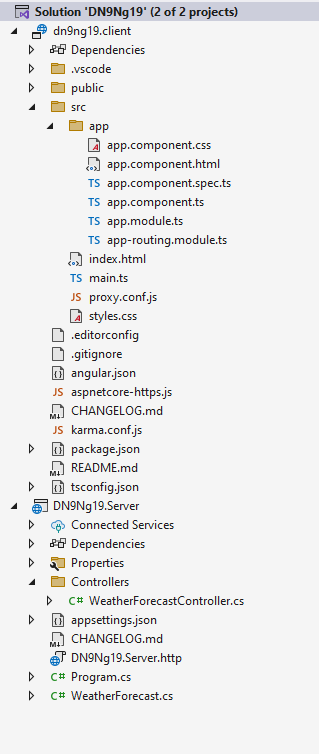
Visual Studio provides a project template for working with Angular and .Net Core.


It creates a solution with separate Web Api and Angular projects.


WeatherForecast Web API's data is consumed by the Angular Component. 


Converting Module based project to Stand alone


The Angular project still uses Modules instead of Stand Alone Component.


ng g @angular/core:standalone
ng generate @angular/core:standalone schematics can be used to convert Module based Angular project to Stand alone.

Sunday, May 12, 2024

.Net 8 MVC

.Net Model View Controller (MVC) is a Server Side Web Application Technology. It Comprises of Model, which is the object oriented representation of data by way of POCO classes. View represents the user interface. Controller represents the user Interaction. There are other alternatives like Razor Pages for creating Server Side .Net applications. Mastering MVC will go a long way in learning other technologies like .Net Web API(with Controllers).

.Net MVC application can be developed either using Visual Studio, Visual Studio Code C# Dev Kit or .Net CLI. I am going develop MVC using Visual Studio.

Convention Over Configuration

Convention over Configuration is a software design pattern which denotes following certain conventions to avoid a lot of configurations. MVC used Convention Over Configuration when it comes to Controllers and Views. Controllers All Controllers should be inside the controllers folder. Controllers should have a Controller suffix. HomeController - Controller name is actually Home. View All the views should be inside the Views folder. There will be a folder in the Views folder corresponding the the Controller. Eg: There will be a Home folder inside the Views Folder for holding the views corresponding to Home Controllers action Methods.

MVC Project Structure

Controllers

User Interaction happens through Controllers. Controllers comprises of Action Methods.
 using Microsoft.AspNetCore.Mvc;  
 namespace MVCShalvin.Controllers  
 {  
   public class HomeController : Controller  
   {  
     public IActionResult Index()  
     {  
       return View();  
     }  
     public IActionResult Privacy()  
     {  
       return View();  
     }     
   }  
 }  
Here there are Index and Privacy Action Methods which returns View.

View

MVC View are created using Razor syntax. Razor comprises of C# code and HTML templates. Razor files have .cshtml extension Inside the Views Folder there is a Shared folder which contains Layout.cshtml which contains the common look and feel for the pages like Header, Footer etc. @RenderBody() section within the Layout.cshtml contains the View specific UI.

Models

 namespace MVCShalvin.Models  
 {  
   public class Faculty  
   {  
     public string Name { get; set; }  
     public string Specialization { get; set; }  
   }  
 }  

Passing data from Controller to View

 using Microsoft.AspNetCore.Mvc;  
 using MVCShalvin.Models;  
 namespace MVCShalvin.Controllers  
 {  
   public class HomeController : Controller  
   {  
     Faculty faculty = new Faculty  
     {  
       Name = "Shalvin P D",  
       Specialization = ".Net"  
     };  
     public IActionResult Index()  
     {  
       return View(faculty);  
     }  
   }  
 }  
Here the faculty object is passed as a parameter to View.

Index.cshtml

 @model MVCShalvin.Models.Faculty  
 <div>Hello @Model.Name specializing in @Model.Specialization</div>  

C# 12

C# is a popular cross platform programming language used to creating wide ranging of applications like Web, Desktop, or Mobile. 


You can create a C# application using wide range of options like  Visual Studio or  Visual Studio Code.

Here I am concentrating on .Net CLI with Visual Studio Code.


.Net CLI

.Net CLI (Command Line Interface) can be used to create and build .Net application.


As mentioned in the options dotnet -h or dotnet --help can be use to display .net help.


Creating a .Net CLI Console project.


 dotnet new console -o HelloConsole  


This command creates a console application within a folder called HelloConsole inside the current folder.


code . opens the current folder which comprises of the project in Visual Studio Code.


Top Level Statement


Program.cs file within project contains WriteLine method of Console class for displaying a message in the command prompt. 

C# follows Pascal case. Identifiers should stat with capital letter. So Console's C, WriteLine's W and L should be capital.

 Console.WriteLine("Hello Shalvin P D");  
Memory Variable
 string name = "Shalvin P D";  
 Console.WriteLine("Hello, {0}", name);  
Interpolation
 string name = "Shalvin";  
 Console.WriteLine($"Hello {name}");  
Multiple Memory Variable
 string name = "Shalvin";  
 string location = "Kochi";  
 Console.WriteLine($"Hello {name}, located at {location}.");  
Memory Variable Console.ReadLine
 string name;  
 Console.WriteLine("Enter your Name: ");  
 name = Console.ReadLine();  
 Console.WriteLine($"Hello {name}");  
Multiple String Memory Variables
 string name, location;  
 Console.WriteLine("Enter your Name: ");  
 name = Console.ReadLine();  
 Console.WriteLine("Enter your Location: ");  
 location = Console.ReadLine();  
 Console.WriteLine($"Hello {name}, located at {location}.");  
Integer Memory Variable
 int i, j, res;  
 i = 23;  
 j = 45;  
 res = i + j;  
 Console.WriteLine(res);  
Int32.Parse (Simple Calculator)
 int i, j, res;  
 Console.WriteLine("Enter Value 1: ");  
   i = Int32.Parse(Console.ReadLine());  
 Console.WriteLine("Enter Value 2: ");  
   j = Int32.Parse(Console.ReadLine());  
 res = i + j;  
 Console.WriteLine(res);  
If Statement
 string city;  
 Console.WriteLine("Enter the Name of the City: ");  
 city = Console.ReadLine();  
 if (city == "Kochi")  
 {  
   Console.WriteLine("Industrial Capital of Kerala");  
 }  
If else
 string city;  
 Console.WriteLine("Enter the Name of the City: ");  
 city = Console.ReadLine();  
 if (city == "Kochi")  
 {  
   Console.WriteLine("Industrial Capital of Kerala");  
 }  
 else  
 {  
   Console.WriteLine("I don't know");  
 }  
Multiple else if
 string city;  
 Console.WriteLine("Enter the Name of the City: ");  
 city = Console.ReadLine();  
 if (city == "Kochi")  
 {  
   Console.WriteLine("Industrial Capital of Kerala");  
 }  
 else if (city == "Trichur")  
 {  
   Console.WriteLine("Cultural Capital of India");  
 }  
 else if (city == "Trivandrum")  
 {  
   Console.WriteLine("Capital of Kerala");  
 }  
 else  
 {  
   Console.WriteLine("I don't know");  
 }  

Thursday, March 28, 2024

Angular : Part 1 Getting Started with StackBlitz

Angular is a Single Page Application (SPA) framework from Google. Single Page Application is a web application that works entirely in the client side creating a rich user experience like that of Desktop application. Gmail is an example of SPA.

Setting a local development Angular requires installing NodeJS.

Easiest way to get started with Angular is Stackblitz. Stackblitz is an online editor.


For starting a new Angular project click the START A NEW APP option. 


Tuesday, August 1, 2023

Python 2 Functions

Functions

 def hello():  
   print("Hello functions")  
 hello()  
Functions with Parameters
 def add(i, j):  
   return i + j  
 print(add(12, 23))  
Exception Handling
 try:  
   i = int(input("Enter value 1 : "))  
   j = int(input("Enter value 2 : "))  
   res = i / j  
   print(res)  
 except ValueError:  
   print("Invalid Input")  
 except ZeroDivisionError:  
   print("Cannot divide by zero")  
 def divide():  
   try:  
     i = int(input("Enter value 1 : "))  
     j = int(input("Enter value 2 : "))   
     res = i / j  
     print(res)  
   except ValueError:  
     print("Invalid Input")  
   except ZeroDivisionError:  
     print("Cannot divide by zero")  

divide()

Python

print

 print("Hello Python")  
Memory Variable
 name = "Shalvin P D"  
 print("Hello ", name)  
Multiple assignments
 name, passion = "Shalvin", "IT"  
 print(f"{name} - {passion}")  
input
 name = input("Enter your name : ")  
 print("Hello ", name)  
int()
 i = int(input("Enter value 1 : "))  
 j = int(input("Enter value 2 : "))  
 res = i + j  
 print(res)  
float()
 i = float(input("Enter value 1 : "))  
 j = float(input("Enter value 2 : "))  
 res = i + j  
 print(res)  

Lists

Lists are mutable collection.
 technologies = [".Net", "Python", "Angular"]  
 for tech in technologies:  
   print(tech)  
Lists append()
 technologies = [".Net", "Python", "Angular"]  
 technologies.append("C#")  
 for tech in technologies:  
   print(tech)  
Lists remove()
 technologies = [".Net", "Python", "Angular", "C#", "PHP"]  
 technologies.remove("PHP")  
 for tech in technologies:  
   print(tech)  
Lists Concatenation

technologies1 = [".Net", "Python", "Angular", "C#"]

technologies2 = ["DevOps", "Jenkins"]

technologies = technologies1 + technologies2

for tech in technologies:
    print(tech)

Tuples

Tuples are Immutable Collection.
 contacts = ("Shalvin", "Arun")  
 for contact in contacts:  
   print(contact)  

Dictionary

Dictionary is a collection of key value pairs.
 contact = {"name" : "Shalvin", "location": "Kochi"}  
 print(contact)  
 print(contact["name"])  
 print(f'{contact["name"]} : {contact["location"]}')  
List of Dictionaries
 contacts = [{"name" : "Shalvin", "location": "Kochi"},  
       {"name": "Praseed", "location": "UK"}]  
 print(contacts)  
 first_contact = contacts[0]  
 print(first_contact)  
 print(f"{first_contact['name']} - {first_contact['location']}")  
 
print("Listing all contacts") for contact in contacts: print(f"{contact['name']} - {contact['location']}")

Monday, May 29, 2023

Blazor I : Blazor Server Getting Started

Blazor is a free and open-source web framework that enables developers to create web apps using C# and HTML developed by Microsoft. Previously creating such apps required the knowledge of JavaScript Libraries/Frameworks like Angular, React, VueJS, JQuery, etc. Now it is possible for .Net developers to use their familiar tools and language (C#) to create compelling UIs. Blazor has different variants like Blazor Server, Blazor Web Assembly, Blazor United aka Full Stack Blazor (.Net 8), etc. In this article we will be concentrating on Blazor Server.

Blazor Server
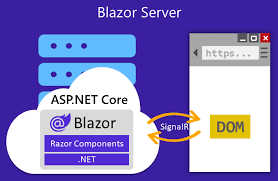
Blazor Server is a Server Side technology for creating highly responsive Single Page Application (SPA). It uses SignalR web sockets to push the UI udates to browser. A persistent connection between Web Server and Client Browser is required for Blazor Server to work. So it is not possible to create Progressive Web Apps (PWA) with Blazor Server. Since Blazor is a Server Side technology it can access all the server resources including database access. No need of an exta Web API layer. Blazor Server works even on old Browsers.
Prerequisites
.Net (Core) 3 or later is required for building Blazor. Visual Studio is recommended by not mandatory. .Net CLI in combination with any editor can be used for creating Blazor Application which we will see later. .Net Core is platform independent so you can develop Blazor application in any platform you like. I am starting out with Visual Studio Community which is a freeware from Microsoft. I am selecting Blazor Server App as the project template.

Thursday, January 26, 2023

Creational Design Patterns


Creational design patterns deal with object creation mechanisms, trying to create objects in a manner suitable to the situation. They increase flexibility in deciding which objects need to be created for a given use case. Some of the most commonly used creational design patterns include:

  • Abstract Factory: Creates an instance of several families of classes.

  • Builder: Separates object construction from its representation, always creates the same type of object.

  • Factory Method: Creates an instance of several derived classes.

  • Prototype: A fully initialized instance to be copied or cloned.

  • Singleton: A class of which only a single instance can exist.

  • Abstract factory pattern: This pattern provides an interface for creating families of related or dependent objects without specifying their concrete classes.

  • Builder pattern: This pattern separates the construction of a complex object from its representation, allowing the same construction process to create various representations.

  • Factory method pattern: This pattern defines an interface for creating an object, but allows subclasses to alter the type of objects that will be created.

  • Prototype pattern: This pattern specifies the kind of objects to create using a prototypical instance, and creates new objects by copying this prototype.

  • Singleton pattern: This pattern ensures that a class has only one instance and provides a global point of access to it.

It's important to note that, the best pattern to use depends on the specific situation, and it's important to weigh the trade-offs between the different options before implementing one.

Design Patterns

Design patterns are a set of best practices and solutions to common problems that occur in software design. They provide a way to structure code in a way that is easy to understand, maintain, and extend. 

There are several types of design patterns, including: 


Creational patterns, which deal with object creation mechanisms, trying to create objects in a manner suitable to the situation. 

Structural patterns, which deal with object composition, creating relationships between objects to form larger structures. 

Behavioral patterns, which deal with communication between objects, what goes on between objects and how they operate together. 


 Some of the most well-known design patterns include:

Singleton pattern, which ensures that a class has only one instance and provides a global point of access to it.

Factory pattern, which creates objects without specifying the exact class of object that will be created.

Observer pattern, which allows objects to be notified of changes to other objects.

Decorator pattern, which allows behavior to be added to an individual object, either statically or dynamically, without affecting the behavior of other objects from the same class.

Strategy pattern, which allows an algorithm's behavior to be selected at runtime.

Design patterns are not specific to any programming language, but they are often implemented in object-oriented languages like C# or Java.

It's important to note that, while design patterns are a great way to solve common problems, they should be used judiciously, as overuse can lead to code that is hard to understand and maintain.

Sunday, April 24, 2022

ReactJS Part 9 : Fetch API POST

Fetch API is using for fetching resources over the internet.


import React, { useState } from 'react';

export function CreateGroup2(props) {
    const [nameValue, setNameValue] = useState("");
    const [detailsValue, setDetailsValue] = useState("");

    const createGroupData = async (event) => {
        event.preventDefault();
        let postData = {
            groupName: nameValue,
            description: detailsValue
        };
        let response = await fetch('api/groups', {
            method: 'POST',
            headers: {
                'Content-Type': 'application/json',
            },
            body: JSON.stringify(postData)
        });

    }

    return (
            <div>
                <form onSubmit={createGroupData}>
                     <div className="form-group">
                          <label htmlFor="name">Name</label>
                          <input
                                type="text"
                                className="form-control"
                                id="name"
                                onChange={(e) => setNameValue(e.target.value)} />
                     </div>
                     <div className="form-group">
                           <label htmlFor="description">Description</label>
                           <input
                               type="text"
                               className="form-control"                                    id="description"
                               onChange={(e) => setDetailsValue(e.target.value)} />
                     </div>
                     <button type="submit" className="btn btn-primary"  id="create-group">Submit</button>                   </form>

                </div>
    );
}


Saturday, April 23, 2022

ReactJS Part 8 .Net Core React - Connecting to Web API - Fetch API GET

The blog is a continuation of ReactJS Part 7 .Net Core React Project.

 In the blog Angular with .Net Core 3 and Visual Studio Code I have discussed creating Web API with .Net 5 CLI. 

Program.cs

using corereact.Models;

var builder = WebApplication.CreateBuilder(args);

// Add services to the container.

builder.Services.AddControllersWithViews();
builder.Services.AddScoped<ContactManagementContext>();
Scaffolded Web API Core Controller code.
#nullable disable
using System;
using System.Collections.Generic;
using System.Linq;
using System.Threading.Tasks;
using Microsoft.AspNetCore.Http;
using Microsoft.AspNetCore.Mvc;
using Microsoft.EntityFrameworkCore;
using corereact2.Models;

namespace corereact2.Controllers
{
    [Route("api/[controller]")]
    [ApiController]
    public class GroupsController : ControllerBase
    {
        private readonly ContactManagementContext _context;

        public GroupsController(ContactManagementContext context)
        {
            _context = context;
        }

        // GET: api/Groups
        [HttpGet]
        public async Task<ActionResult<IEnumerable<Group>>> GetGroups()
        {
            return await _context.Groups.ToListAsync();
        }

        // GET: api/Groups/5
        [HttpGet("{id}")]
        public async Task<ActionResult<Group>> GetGroup(int id)
        {
            var @group = await _context.Groups.FindAsync(id);

            if (@group == null)
            {
                return NotFound();
            }

            return @group;
        }

        // PUT: api/Groups/5
        [HttpPut("{id}")]
        public async Task<IActionResult> PutGroup(int id, Group @group)
        {
            if (id != @group.GroupId)
            {
                return BadRequest();
            }

            _context.Entry(@group).State = EntityState.Modified;

            try
            {
                await _context.SaveChangesAsync();
            }
            catch (DbUpdateConcurrencyException)
            {
                if (!GroupExists(id))
                {
                    return NotFound();
                }
                else
                {
                    throw;
                }
            }

            return NoContent();
        }

        // POST: api/Groups
        [HttpPost]
        public async Task<ActionResult<Group>> PostGroup(Group @group)
        {
            _context.Groups.Add(@group);
            await _context.SaveChangesAsync();

            return CreatedAtAction("GetGroup", new { id = @group.GroupId }, @group);
        }

        // DELETE: api/Groups/5
        [HttpDelete("{id}")]
        public async Task<IActionResult> DeleteGroup(int id)
        {
            var @group = await _context.Groups.FindAsync(id);
            if (@group == null)
            {
                return NotFound();
            }

            _context.Groups.Remove(@group);
            await _context.SaveChangesAsync();

            return NoContent();
        }

        private bool GroupExists(int id)
        {
            return _context.Groups.Any(e => e.GroupId == id);
        }
    }
}

ReactJS Home.js
import React, {useState, useEffect } from 'react';

export function Home(){
  let [groupsData, setGroupsData] = useState([]);

  const populateGroupData = async () => {
    const response = await fetch('api/groups');
    const data = await response.json();
    return data;
}

useEffect(() => {
  populateGroupData()
      .then(data => setGroupsData(data));
}, []);

  return (
      <div>
        <h1>Groups</h1>
        <table className='table table-striped'>
                <thead>
                    <tr>
                        <th>Name</th>
                        <th>Details</th>
                        <th></th>
                    </tr>
                </thead>
                <tbody>
                    {groupsData.map(group =>
                        <tr key={group.groupId}>
                            <td>{group.groupName}</td>
                            <td>{group.description}</td>
                        </tr>
                    )}
                    
                </tbody>
            </table>
      </div>
    );
  }


ReactJS Part 7 .Net Core React Project

 Create-React-App is an excellent option for creating a new React application. Other options also exist. .Net React project can be considered if .Net Core Web API is the REST option for React. It handles a lot of plumbing issues for the developer. The routing is also configured.


In this blog I am going to handle the .Net CLI way of creating an .Net Core React application. My favorite editor is Visual Studio Code which comes with a good collection of useful extension. Any editor can be used.  The same is possible with Visual Studio also which I will handle on another blog. 


dotnet new react -o corereact


Inside the ClientApp folder is the ReactJS project.


 The .Net Core React Project comes packed with a few components. Notably the NavMenu.js comes with reacter-router.


ReactJS Part 6 Rendering a List

 ES 6 Map can be use to iterate through a collection of data.

import React, {useState} from "react";
import "./style.css";

export default function App() {
  const [contacts,setContact] = useState([
    {name: 'Shalvin', key:1},
    {name: 'Joy', key:2},
    {name: 'Arun', key:3}
  ]);
  return (
    <div>
     {contacts.map( (contact) =>
        <div>{contact.key} - {contact.name} </div>

     )}
    </div>
  );
}

ReactJS Part 5 State

State are used for changing values within a React Component. 

useState is required to implement State in React functional component. It returns a variable and a function. I am using ES6 array destructing to hold the variable and function. 


import React, { useState } from 'react';

function useStateHookDemo(props) {
  let [numberOfClicks, setNumberOfClicks] = useState(123);

  return (
    <div>
      <h1>Number of clicks is {numberOfClicks}</h1>
      <button onClick={() => setNumberOfClicks(numberOfClicks + 1)}>
        Counter
      </button>
    </div>
  );
}

export default useStateHookDemo;

In the button click the function to alter the state variable is called.

Saturday, April 9, 2022

ReactJS Part 4 : Events

All the HTML Controls events are available to React components as props. The event names should have on prefix followed by event name which should be initially capital.

function EventHandling() {
    
    function helloFunction(){
        alert('Hello function')
    }

    const helloArrowSyntax = () => {alert('Hello')}
    return (
    <div>
        <div><button onClick={() => {alert('Hello inline')}}>Hello inline</button></div>
        <div><button onClick={helloFunction}>Hello function</button></div>
        <div><button onClick={helloArrowSyntax}>Hello Arrow Syntax</button></div>
    </div>
  )
}
export default EventHandling


ReactJS Part3 : Props

Props allows pass data to a component. 

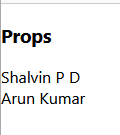
In this example we can pass data from the parent component ie. App.js to the child component ie. Contact.js.

Contact.js

import React from 'react'

function Contact(props) {
  return (
    <div>{props.name}</div>
  )
}
export default Contact

App.js

import Contact from './components/Contact';

function App() {
  return (
    <div>
       <h3>Props</h3>
       
       <Contact name = "Shalvin P D"/>
       <Contact name = "Arun Kumar"/>
    </div>
  );
}
export default App;


Here is the Contact.js functional component making use of ES6 arrow syntax.

const Contact = (props) =>  {
  return (
    <div>{props.name}</div>
  )
}
export default Contact

Thursday, April 7, 2022

ReactJS Part 2 Create React App


Create-react-app

Create React App is the preferred way to create a React Application. NodeJS should be installed prior to executing npm create-react-app. The reason why we install NodeJS is to have npm (Node Package  Manager). Other than that nothing related to NodeJS is required in ReactJS.

 >npx  create-react-app hello-react1


>npm start


package.json file contains all the dependencies of ReactJS appllication.

src folder contains the source code of your application.

Inside the public folder there is index.html file which is the only html page of the React Single Page application.


App.js
import logo from './logo.svg';
import './App.css';

function App() {
  return (
    <div className="App">
     <h2>Shalvin P D</h2>
    </div>
  );
}

export default App;

  The basic building block of  React is Component. A component can be written either using class or a function. Here I am creating a functional component called App. JSX is used to create react components. JSX will in turn be converted to JavaScript.

Index.js

import ReactDOM from 'react-dom';
import App from './App';

ReactDOM.render(<App />, document.getElementById('root')
);

Index.js is the first file to execute. Index.js is making using of App component created earlier.

Here App is the root component. Every React app will have one and only root component.


Visual Studio Code

You can use any editor for creating React applications. My preferred choice is Visual Studio Code. Visual Studio Code is a free and feature rich editor with plenty of Extensions.

I will be using ES7+ React/Redux/React-Native snippets for creating ReactJS applications.


 Creating Component
Inside the src folder I have created at folder called components. Inside the component folder I have created a file called Contact.js. 
 
rfce
 
In  the Contact.js file I typed rfce tab which created the code for a functional component with default export. 
 
Contact.js
function Contacts() {
  return (
    <div>Contacts</div>
  )
}
export default Contacts


function App() {
  return (
    <div className="App">
        <h2>Shalvin P D</h2>
        <Contacts/>
    </div>
  );
}
export default App;


Data

function Contacts() {
    let location = 'Kochi'
  return (
    <div>Located at {location}</div>
  )
}
export default Contacts 


import Contacts from './components/Contacts';

function App() {
  return (
    <div className="App">
        <h2>Shalvin P D</h2>
        <Contacts/>
    </div>
  );
}
export default App;