Microsoft Community Tech Day - 30th Jan 2010 - Kochi
IMA House, J. N. International Stadium Road,Palarivattom P.O., Cochin 682025, Kerala
Agenda
09:15 - 09:30 Welcome Speech
09.30 - 10:30 Write your own .NET compiler - Praseed Pai
10.30 - 11:15 Building Apps with ASP.NET MVC 2 and Entity Framework - Shiju Varghese
Tea Break (15 min)
11.30 - 12:15 Beyond the relational SQL server 2008 - Jeen Shene Stanislaus
12.15 - 01:15 Microsoft Expression and Introduction to Silverlight - Roopak Nair
Lunch Break (45 min)
02.00 - 03:00 Writing Secure Code - Jairam Ramesh
03:00 - 04:00 Diving to Silverlight - Anoop Madhusudanan
04.00 - 05:00 Programming for Windows 7 - Shoban Kumar
05:00 - 05:30 Prize distribution and Closing Ceremony
Free Registration either at http://communitytechdays.com/ (if you have live id)
Or
Click and Registier
Wednesday, January 20, 2010
Microsoft Community Tech Day - 30th Jan 2010 - Kochi


Monday, December 21, 2009
Globalization in Windows Forms - Application with multi language support
This blog is the continuation of .Net Globalization blog.
If you want to have a global market for your project then you have to plan for implementing multi language support.
Create a form as shown below.
Add Another form. This is the form whose language text we are planning to change based on the selection from the combobox of first form. Give English Texts to Form and Controls.
Select the form set the Localizable property to True and Language to French(France).
Now select the existing controls and change its Text property to corresponding French equivalent as shown in the figure.
Go back to the first form where you can select the language.
In this form we are going to change the culture of the current thread based on the culture
Explanations and additional information will follow soon.
using System.Globalization;
using System.Threading;
private void cboLang_SelectedIndexChanged(object
sender, EventArgs e)
{
if(cboLang.Text == "French")
Thread.CurrentThread.CurrentUICulture = new
CultureInfo("fr-FR");
else
Thread.CurrentThread.CurrentUICulture = new
CultureInfo("en-US");
}
private void btnShowForm_Click(object sender, EventArgs
e)
{
frmLang fl = new frmLang();
fl.Show();
}
VB .Net
Imports System.Globalization
Imports System.Threading
Public Class Form1
Private Sub cboLang_SelectedIndexChanged(ByVal sender As System.Object, ByVal e As System.EventArgs) Handles cboLang.SelectedIndexChanged
If cboLang.Text = "English" Then
Thread.CurrentThread.CurrentUICulture = New CultureInfo("en-US")
Else
Thread.CurrentThread.CurrentUICulture = New CultureInfo("fr-FR")
End If
End Sub
Private Sub btnShowForm_Click(ByVal sender As System.Object, ByVal e As System.EventArgs) Handles btnShowForm.Click
Dim fl As New frmLang
fl.Show()
End Sub
End Class
Now when you run the application, select French from the ComboBox and click show form the French form will appear and when you select English, English form will appear.
Windows Forms VB .Net Generated Code
'Form1
Private Sub InitializeComponent()
Me.Label1 = New System.Windows.Forms.Label
Me.cboLang = New System.Windows.Forms.ComboBox
Me.btnShowForm = New System.Windows.Forms.Button
Me.SuspendLayout()
'
'Label1
'
Me.Label1.AutoSize = True
Me.Label1.Location = New System.Drawing.Point(52, 70)
Me.Label1.Name = "Label1"
Me.Label1.Size = New System.Drawing.Size(88, 13)
Me.Label1.TabIndex = 0
Me.Label1.Text = "Select Language"
'
'cboLang
'
Me.cboLang.FormattingEnabled = True
Me.cboLang.Items.AddRange(New Object() {"English", "French"})
Me.cboLang.Location = New System.Drawing.Point(159, 62)
Me.cboLang.Name = "cboLang"
Me.cboLang.Size = New System.Drawing.Size(121, 21)
Me.cboLang.TabIndex = 1
'
'btnShowForm
'
Me.btnShowForm.Location = New System.Drawing.Point(159, 113)
Me.btnShowForm.Name = "btnShowForm"
Me.btnShowForm.Size = New System.Drawing.Size(75, 23)
Me.btnShowForm.TabIndex = 2
Me.btnShowForm.Text = "&Show Form"
Me.btnShowForm.UseVisualStyleBackColor = True
'
'Form1
'
Me.AutoScaleDimensions = New System.Drawing.SizeF(6.0!, 13.0!)
Me.AutoScaleMode = System.Windows.Forms.AutoScaleMode.Font
Me.ClientSize = New System.Drawing.Size(292, 266)
Me.Controls.Add(Me.btnShowForm)
Me.Controls.Add(Me.cboLang)
Me.Controls.Add(Me.Label1)
Me.Name = "Form1"
Me.Text = "Shalvin.com"
Me.ResumeLayout(False)
Me.PerformLayout()
End Sub
Friend WithEvents Label1 As System.Windows.Forms.Label
Friend WithEvents cboLang As System.Windows.Forms.ComboBox
Friend WithEvents btnShowForm As System.Windows.Forms.Button
'frmLang
Private Sub InitializeComponent()
Me.Label1 = New System.Windows.Forms.Label
Me.txtName = New System.Windows.Forms.TextBox
Me.Label2 = New System.Windows.Forms.Label
Me.txtPhone = New System.Windows.Forms.TextBox
Me.btnSave = New System.Windows.Forms.Button
Me.SuspendLayout()
'
'Label1
'
Me.Label1.AutoSize = True
Me.Label1.Location = New System.Drawing.Point(41, 55)
Me.Label1.Name = "Label1"
Me.Label1.Size = New System.Drawing.Size(35, 13)
Me.Label1.TabIndex = 0
Me.Label1.Text = "Name"
'
'txtName
'
Me.txtName.Location = New System.Drawing.Point(103, 48)
Me.txtName.Name = "txtName"
Me.txtName.Size = New System.Drawing.Size(100, 20)
Me.txtName.TabIndex = 1
'
'Label2
'
Me.Label2.AutoSize = True
Me.Label2.Location = New System.Drawing.Point(41, 105)
Me.Label2.Name = "Label2"
Me.Label2.Size = New System.Drawing.Size(38, 13)
Me.Label2.TabIndex = 2
Me.Label2.Text = "Phone"
'
'txtPhone
'
Me.txtPhone.Location = New System.Drawing.Point(103, 98)
Me.txtPhone.Name = "txtPhone"
Me.txtPhone.Size = New System.Drawing.Size(100, 20)
Me.txtPhone.TabIndex = 3
'
'btnSave
'
Me.btnSave.Location = New System.Drawing.Point(103, 140)
Me.btnSave.Name = "btnSave"
Me.btnSave.Size = New System.Drawing.Size(75, 23)
Me.btnSave.TabIndex = 4
Me.btnSave.Text = "Save"
Me.btnSave.UseVisualStyleBackColor = True
'
'frmLang
'
Me.AutoScaleDimensions = New System.Drawing.SizeF(6.0!, 13.0!)
Me.AutoScaleMode = System.Windows.Forms.AutoScaleMode.Font
Me.ClientSize = New System.Drawing.Size(292, 266)
Me.Controls.Add(Me.btnSave)
Me.Controls.Add(Me.txtPhone)
Me.Controls.Add(Me.Label2)
Me.Controls.Add(Me.txtName)
Me.Controls.Add(Me.Label1)
Me.Name = "frmLang"
Me.Text = "English"
Me.ResumeLayout(False)
Me.PerformLayout()
End Sub
Friend WithEvents Label1 As System.Windows.Forms.Label
Friend WithEvents txtName As System.Windows.Forms.TextBox
Friend WithEvents Label2 As System.Windows.Forms.Label
Friend WithEvents txtPhone As System.Windows.Forms.TextBox
Friend WithEvents btnSave As System.Windows.Forms.Button
Friday, December 4, 2009
Contact Management System VB .Net Windows Generated Code
The purpose of this blog is easy recreation of the visual intereface of the project for my student comunity.
The .Net Windows Form of Visual Studion 2008 is made up of two partial classes and a resource file.

If you click the Show All Files icon in the Solution solution explorer then you cann see all the files I have mentioned before.

If you replace the InitializeComponents function with your visual intereface code then you will get a new visual interface.

Private Sub InitializeComponent()
Me.MenuStrip1 = New System.Windows.Forms.MenuStrip
Me.FileToolStripMenuItem = New System.Windows.Forms.ToolStripMenuItem
Me.ExitToolStripMenuItem = New System.Windows.Forms.ToolStripMenuItem
Me.MasterToolStripMenuItem = New System.Windows.Forms.ToolStripMenuItem
Me.GroupsToolStripMenuItem = New System.Windows.Forms.ToolStripMenuItem
Me.ContactsToolStripMenuItem = New System.Windows.Forms.ToolStripMenuItem
Me.MenuStrip1.SuspendLayout()
Me.SuspendLayout()
'
'MenuStrip1
'
Me.MenuStrip1.Items.AddRange(New System.Windows.Forms.ToolStripItem() {Me.FileToolStripMenuItem, Me.MasterToolStripMenuItem})
Me.MenuStrip1.Location = New System.Drawing.Point(0, 0)
Me.MenuStrip1.Name = "MenuStrip1"
Me.MenuStrip1.Size = New System.Drawing.Size(292, 24)
Me.MenuStrip1.TabIndex = 1
Me.MenuStrip1.Text = "MenuStrip1"
'
'FileToolStripMenuItem
'
Me.FileToolStripMenuItem.DropDownItems.AddRange(New System.Windows.Forms.ToolStripItem() {Me.ExitToolStripMenuItem})
Me.FileToolStripMenuItem.Name = "FileToolStripMenuItem"
Me.FileToolStripMenuItem.Size = New System.Drawing.Size(35, 20)
Me.FileToolStripMenuItem.Text = "&File"
'
'ExitToolStripMenuItem
'
Me.ExitToolStripMenuItem.Name = "ExitToolStripMenuItem"
Me.ExitToolStripMenuItem.Size = New System.Drawing.Size(152, 22)
Me.ExitToolStripMenuItem.Text = "&Exit"
'
'MasterToolStripMenuItem
'
Me.MasterToolStripMenuItem.DropDownItems.AddRange(New System.Windows.Forms.ToolStripItem() {Me.GroupsToolStripMenuItem, Me.ContactsToolStripMenuItem})
Me.MasterToolStripMenuItem.Name = "MasterToolStripMenuItem"
Me.MasterToolStripMenuItem.Size = New System.Drawing.Size(52, 20)
Me.MasterToolStripMenuItem.Text = "&Master"
'
'GroupsToolStripMenuItem
'
Me.GroupsToolStripMenuItem.Name = "GroupsToolStripMenuItem"
Me.GroupsToolStripMenuItem.Size = New System.Drawing.Size(152, 22)
Me.GroupsToolStripMenuItem.Text = "&Groups"
'
'ContactsToolStripMenuItem
'
Me.ContactsToolStripMenuItem.Name = "ContactsToolStripMenuItem"
Me.ContactsToolStripMenuItem.Size = New System.Drawing.Size(152, 22)
Me.ContactsToolStripMenuItem.Text = "&Contacts"
'
'Form1
'
Me.AutoScaleDimensions = New System.Drawing.SizeF(6.0!, 13.0!)
Me.AutoScaleMode = System.Windows.Forms.AutoScaleMode.Font
Me.ClientSize = New System.Drawing.Size(292, 272)
Me.Controls.Add(Me.MenuStrip1)
Me.IsMdiContainer = True
Me.MainMenuStrip = Me.MenuStrip1
Me.Name = "Form1"
Me.Text = "Contact Mangement System"
Me.WindowState = System.Windows.Forms.FormWindowState.Maximized
Me.MenuStrip1.ResumeLayout(False)
Me.MenuStrip1.PerformLayout()
Me.ResumeLayout(False)
Me.PerformLayout()
End Sub
Friend WithEvents MenuStrip1 As System.Windows.Forms.MenuStrip
Friend WithEvents FileToolStripMenuItem As System.Windows.Forms.ToolStripMenuItem
Friend WithEvents ExitToolStripMenuItem As System.Windows.Forms.ToolStripMenuItem
Friend WithEvents MasterToolStripMenuItem As System.Windows.Forms.ToolStripMenuItem
Friend WithEvents GroupsToolStripMenuItem As System.Windows.Forms.ToolStripMenuItem
Friend WithEvents ContactsToolStripMenuItem As System.Windows.Forms.ToolStripMenuItem
'frmGroups
Private Sub InitializeComponent()
Me.Label1 = New System.Windows.Forms.Label
Me.lstGroups = New System.Windows.Forms.ListBox
Me.txtGroup = New System.Windows.Forms.TextBox
Me.btnAdd = New System.Windows.Forms.Button
Me.SuspendLayout()
'
'Label1
'
Me.Label1.AutoSize = True
Me.Label1.Location = New System.Drawing.Point(26, 33)
Me.Label1.Name = "Label1"
Me.Label1.Size = New System.Drawing.Size(36, 13)
Me.Label1.TabIndex = 0
Me.Label1.Text = "Group"
'
'lstGroups
'
Me.lstGroups.FormattingEnabled = True
Me.lstGroups.Location = New System.Drawing.Point(90, 113)
Me.lstGroups.Name = "lstGroups"
Me.lstGroups.Size = New System.Drawing.Size(120, 95)
Me.lstGroups.TabIndex = 1
'
'txtGroup
'
Me.txtGroup.Location = New System.Drawing.Point(90, 26)
Me.txtGroup.Name = "txtGroup"
Me.txtGroup.Size = New System.Drawing.Size(100, 20)
Me.txtGroup.TabIndex = 0
'
'btnAdd
'
Me.btnAdd.Location = New System.Drawing.Point(90, 64)
Me.btnAdd.Name = "btnAdd"
Me.btnAdd.Size = New System.Drawing.Size(75, 23)
Me.btnAdd.TabIndex = 1
Me.btnAdd.Text = "&Add"
Me.btnAdd.UseVisualStyleBackColor = True
'
'frmGroups
'
Me.AutoScaleDimensions = New System.Drawing.SizeF(6.0!, 13.0!)
Me.AutoScaleMode = System.Windows.Forms.AutoScaleMode.Font
Me.ClientSize = New System.Drawing.Size(292, 272)
Me.Controls.Add(Me.btnAdd)
Me.Controls.Add(Me.txtGroup)
Me.Controls.Add(Me.lstGroups)
Me.Controls.Add(Me.Label1)
Me.Name = "frmGroups"
Me.Text = "frmGroups"
Me.ResumeLayout(False)
Me.PerformLayout()
End Sub
Friend WithEvents Label1 As System.Windows.Forms.Label
Friend WithEvents lstGroups As System.Windows.Forms.ListBox
Friend WithEvents txtGroup As System.Windows.Forms.TextBox
Friend WithEvents btnAdd As System.Windows.Forms.Button
'frmContacts
Private Sub InitializeComponent()
Me.Label1 = New System.Windows.Forms.Label
Me.cboGroups = New System.Windows.Forms.ComboBox
Me.Label2 = New System.Windows.Forms.Label
Me.txtContact = New System.Windows.Forms.TextBox
Me.btnAdd = New System.Windows.Forms.Button
Me.Label3 = New System.Windows.Forms.Label
Me.txtPhone = New System.Windows.Forms.TextBox
Me.Label4 = New System.Windows.Forms.Label
Me.txtEmail = New System.Windows.Forms.TextBox
Me.DataGridView1 = New System.Windows.Forms.DataGridView
CType(Me.DataGridView1, System.ComponentModel.ISupportInitialize).BeginInit()
Me.SuspendLayout()
'
'Label1
'
Me.Label1.AutoSize = True
Me.Label1.Location = New System.Drawing.Point(31, 45)
Me.Label1.Name = "Label1"
Me.Label1.Size = New System.Drawing.Size(41, 13)
Me.Label1.TabIndex = 0
Me.Label1.Text = "Groups"
'
'cboGroups
'
Me.cboGroups.FormattingEnabled = True
Me.cboGroups.Location = New System.Drawing.Point(102, 37)
Me.cboGroups.Name = "cboGroups"
Me.cboGroups.Size = New System.Drawing.Size(121, 21)
Me.cboGroups.TabIndex = 1
'
'Label2
'
Me.Label2.AutoSize = True
Me.Label2.Location = New System.Drawing.Point(262, 45)
Me.Label2.Name = "Label2"
Me.Label2.Size = New System.Drawing.Size(49, 13)
Me.Label2.TabIndex = 2
Me.Label2.Text = "Contacts"
'
'txtContact
'
Me.txtContact.Location = New System.Drawing.Point(337, 37)
Me.txtContact.Name = "txtContact"
Me.txtContact.Size = New System.Drawing.Size(100, 20)
Me.txtContact.TabIndex = 3
'
'btnAdd
'
Me.btnAdd.Location = New System.Drawing.Point(168, 133)
Me.btnAdd.Name = "btnAdd"
Me.btnAdd.Size = New System.Drawing.Size(75, 23)
Me.btnAdd.TabIndex = 4
Me.btnAdd.Text = "&Add"
Me.btnAdd.UseVisualStyleBackColor = True
'
'Label3
'
Me.Label3.AutoSize = True
Me.Label3.Location = New System.Drawing.Point(34, 96)
Me.Label3.Name = "Label3"
Me.Label3.Size = New System.Drawing.Size(38, 13)
Me.Label3.TabIndex = 5
Me.Label3.Text = "Phone"
'
'txtPhone
'
Me.txtPhone.Location = New System.Drawing.Point(102, 89)
Me.txtPhone.Name = "txtPhone"
Me.txtPhone.Size = New System.Drawing.Size(100, 20)
Me.txtPhone.TabIndex = 6
'
'Label4
'
Me.Label4.AutoSize = True
Me.Label4.Location = New System.Drawing.Point(262, 96)
Me.Label4.Name = "Label4"
Me.Label4.Size = New System.Drawing.Size(32, 13)
Me.Label4.TabIndex = 7
Me.Label4.Text = "Email"
'
'txtEmail
'
Me.txtEmail.Location = New System.Drawing.Point(337, 89)
Me.txtEmail.Name = "txtEmail"
Me.txtEmail.Size = New System.Drawing.Size(100, 20)
Me.txtEmail.TabIndex = 8
'
'DataGridView1
'
Me.DataGridView1.ColumnHeadersHeightSizeMode = System.Windows.Forms.DataGridViewColumnHeadersHeightSizeMode.AutoSize
Me.DataGridView1.Location = New System.Drawing.Point(12, 175)
Me.DataGridView1.Name = "DataGridView1"
Me.DataGridView1.Size = New System.Drawing.Size(439, 222)
Me.DataGridView1.TabIndex = 9
'
'frmContacts
'
Me.AutoScaleDimensions = New System.Drawing.SizeF(6.0!, 13.0!)
Me.AutoScaleMode = System.Windows.Forms.AutoScaleMode.Font
Me.ClientSize = New System.Drawing.Size(463, 405)
Me.Controls.Add(Me.DataGridView1)
Me.Controls.Add(Me.txtEmail)
Me.Controls.Add(Me.Label4)
Me.Controls.Add(Me.txtPhone)
Me.Controls.Add(Me.Label3)
Me.Controls.Add(Me.btnAdd)
Me.Controls.Add(Me.txtContact)
Me.Controls.Add(Me.Label2)
Me.Controls.Add(Me.cboGroups)
Me.Controls.Add(Me.Label1)
Me.Name = "frmContacts"
Me.Text = "frmContacts"
CType(Me.DataGridView1, System.ComponentModel.ISupportInitialize).EndInit()
Me.ResumeLayout(False)
Me.PerformLayout()
End Sub
Friend WithEvents Label1 As System.Windows.Forms.Label
Friend WithEvents cboGroups As System.Windows.Forms.ComboBox
Friend WithEvents Label2 As System.Windows.Forms.Label
Friend WithEvents txtContact As System.Windows.Forms.TextBox
Friend WithEvents btnAdd As System.Windows.Forms.Button
Friend WithEvents Label3 As System.Windows.Forms.Label
Friend WithEvents txtPhone As System.Windows.Forms.TextBox
Friend WithEvents Label4 As System.Windows.Forms.Label
Friend WithEvents txtEmail As System.Windows.Forms.TextBox
Friend WithEvents DataGridView1 As System.Windows.Forms.DataGridView
Wednesday, December 2, 2009
Many To Many Relationship Table Script
I am creating a database for tracking the Cricketers and their types. By types I mean Batsman, Bowler, Wicket Keeper, etc.
The issue is a Cricketer might belong to different type. For Example Kapil Dev is both a Batsman and a Bowler.
Inorder to solve this I should create a third table referred to as Junction Table apart from Cricketer and Type tables which is having reference to both Crickter and Type tables and a Composite Key. Here I name it Cricketer Type.
Create database Cricket
use Cricket
Create table Cricketer (CricketerId int identity(1,1) primary key,Cricketer varchar(40))
Create table Type (TypeId int identity(1,1) primary key,Type varchar(40))
insert into Cricketer values ('Sumesh')
insert into Cricketer values ('Nithin')
insert into Cricketer values ('Shalvin')
insert into Cricketer values ('Mongia')
insert into Type values ('Batsman')
insert into Type values ('Bowler')
insert into Type values ('Wicket Keeper')
create table CricketerType(primary key (CricketerId, TypeId),CricketerId int references Cricketer(CricketerId),TypeId int references Type(TypeId) )
insert into CricketerType values (1, 1)
insert into CricketerType values (1, 3)
insert into CricketerType values (2, 2)
insert into CricketerType values (3, 3)
insert into CricketerType values (4, 3)
select * from Cricketer
select * from Type
select * from CricketerType
select C.CricketerId, C.Cricketer, T.Type from Cricketer C, Type T,CricketerType CT where CT.CricketerId = C.CricketerId and Ct.TypeId = T.TypeId
Sunday, November 29, 2009
Excel Integration with .Net
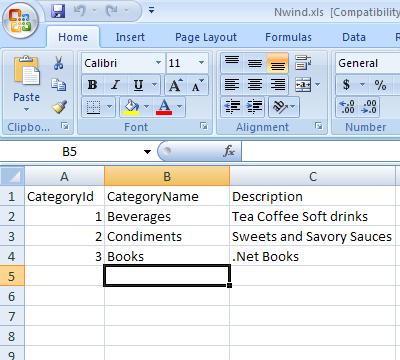
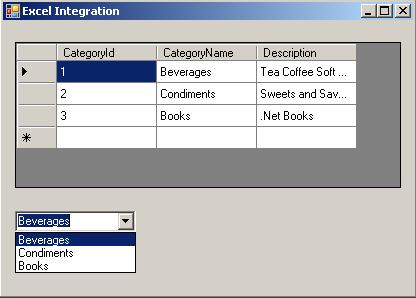
Here I am populating both a DataGridView and ComboBox with Excel Data.
OleDbConnection cnn;
public DataSet GetData(String SheetName){
String Query = "SELECT * FROM [" + SheetName + "];"; OleDbDataAdapter myCommand = new OleDbDataAdapter(Query, cnn);
DataSet myDataSet = new DataSet();
myCommand.Fill(myDataSet, "ExcelInfo");
return myDataSet;
}
private void Form1_Load(object sender, EventArgs e){
cnn = new OleDbConnection("Provider=Microsoft.Jet.OLEDB.4.0;" + "Data Source=" + "Alloc.xls" + ";" + "Extended Properties=Excel 8.0");
OleDbDataAdapter da;
DataSet ds = GetData("Sheet1$");
DataTable dt = ds.Tables[0];
dataGridView1.DataSource = ds.Tables[0];
comboBox1.DataSource = ds.Tables[0]; comboBox1.DisplayMember = "CategoryName";
}
Friday, November 6, 2009
Microsoft Office SharePoint Server (MOSS) Installation ScreenShots
Microsoft Office SharePoint Server (MOSS) is Web based collaboration, content and document management platform from Microsoft.
MOSS requires Windows Server 2003 Sp1 or above, .Net Framework 2.x and 3.x. The contents are stored in Sql Server 2005.
To start the installation double click the OfficeServer.exe present inside MOSS2007_SETUP folder.


Wednesday, November 4, 2009
Deploying and Migrating Your Client/Server Infrastructure to Windows 7 / Windows Server 2008 R2
Date : 5th November 2009
Venue : Taj Gateway Hotel
Waterfront Hall
Marine Drive, Ernakulam 682 011
Kerala, India
Time : 10.00 AM to 1.30 PM
10:00 am -11:30 am
Introducing Windows 7
In this session we will have a look into the new Windows 7 feature enhancements like Security, Web enhancements, UI Enhancements and tools for IT Pros
11:30 -11:45 am
Break
11:45 am – 12:30 pm
Windows 7 – Upgrade and Deployment
In this session you will get to see and know the tools available to upgrade, migrate and deploy Windows 7 in the enterprise like User State Migration Tool, Microsoft Assessment and Planning Toolkit, Windows Easy Transfer, and Microsoft Deployment Toolkit 2010.
12:30 – 1:30 pm
What’s New in Windows Server 2008 R2
In this session we will have a look into the new Active Directory features, Group Policy changes and other new features in Windows Server 2008 R2.
Click here to Register now!
For More Details, you can call 080 41161412.
Friday, October 30, 2009
Silverlight 3 support in Visual Web Developer 2010 Beta 2
Starting With Visual Web Developer 2008 sp1 there is the New Project option in Vwd. So go to File, New Project and Select Silverlight Application.

Let host the Silverlight Application in Asp .Net Application.

If you inspect the Properties Window you can notice that there is both Alphabetical and Categorized View of Entries and also Events. In C# Express Edition 2080 there was only the Categorized View in Properties. I am basically a lover of Alphabetical View.

private void button1_Click(object sender, RoutedEventArgs e)
{
MessageBox.Show("Welcome to Silverlight 3");
}
In short Working with Silverlight 3 in Vwd 2010 is as cool as working with Asp .Net Application.


